
A lot of Dallas-Fort Worth homeowners start in the same place. They've got a patio, a grill that's doing its best, and a backyard that feels close to becoming a real gathering space. They can already see the weekend routine: steaks on the grill, drinks cold and nearby, no constant trips through the kitchen, and enough prep space that cooking outside feels easy instead of improvised.
Then reality shows up. The sun beats on one side of the yard all afternoon. The pool gate cuts through the exact spot where the grill would make sense. There's no water line where the sink needs to go. The finish they liked in a showroom suddenly looks like a maintenance problem in North Texas heat.
That's why good outdoor kitchen design plans matter. Not mood boards. Not appliance wish lists. Actual plans that deal with the site, the utilities, the materials, and the way people move through the yard.
Texas is one of the country's core outdoor-kitchen markets. The NKBA outdoor kitchen consumer profile notes that more than one-third of the U.S. market is in California, Texas, and Florida, and most owners use or plan to use their outdoor kitchen at least a few times a week for three seasons out of the year. In DFW, that tracks with what homeowners want from a backyard. They don't want a novelty. They want a space that gets used.
From Dream to Blueprint An Introduction
A strong outdoor kitchen usually starts with a simple goal. You want to stay outside with your guests instead of disappearing into the house every few minutes. You want prep space near the grill, storage for tools and serving pieces, and a layout that feels intentional instead of pieced together over time.
In DFW, that goal makes sense. The climate supports outdoor living for long stretches of the year, but it also punishes weak planning. A kitchen that looks great in a rendering can turn into a headache fast if the grill sits in the wrong wind path, the refrigerator bakes in direct afternoon sun, or the countertop stains and fades under constant exposure.
The difference between a project that gets used and one that gets tolerated usually comes down to the blueprint stage. Homeowners often focus first on the fun decisions: grill brand, bar seating, pizza oven, maybe a beverage center. Those choices matter, but they come later. The hard part is deciding where the kitchen should live, how much room the yard can give it, and which features are worth building now versus later.
Outdoor kitchens stopped being a niche luxury a while ago. In warm-weather markets, homeowners build them because they expect to use them regularly, not just admire them.
Good outdoor kitchen design plans do four things well. They respect the site. They organize cooking and prep logically. They solve utilities before construction starts. They choose materials that can handle DFW heat, storms, and maintenance demands. If any one of those gets skipped, the project usually gets more expensive and less functional.
Start with a Smart Site Analysis
The first mistake homeowners make is choosing appliances before studying the yard. That reverses the process. A professional workflow starts with a site-constraint survey and a scaled plan that maps property lines, doors, trees, and utility access. That early planning helps compare options against budget and function before construction starts and avoids late-stage conflicts, as outlined in Cedreo's outdoor kitchen design guidance.
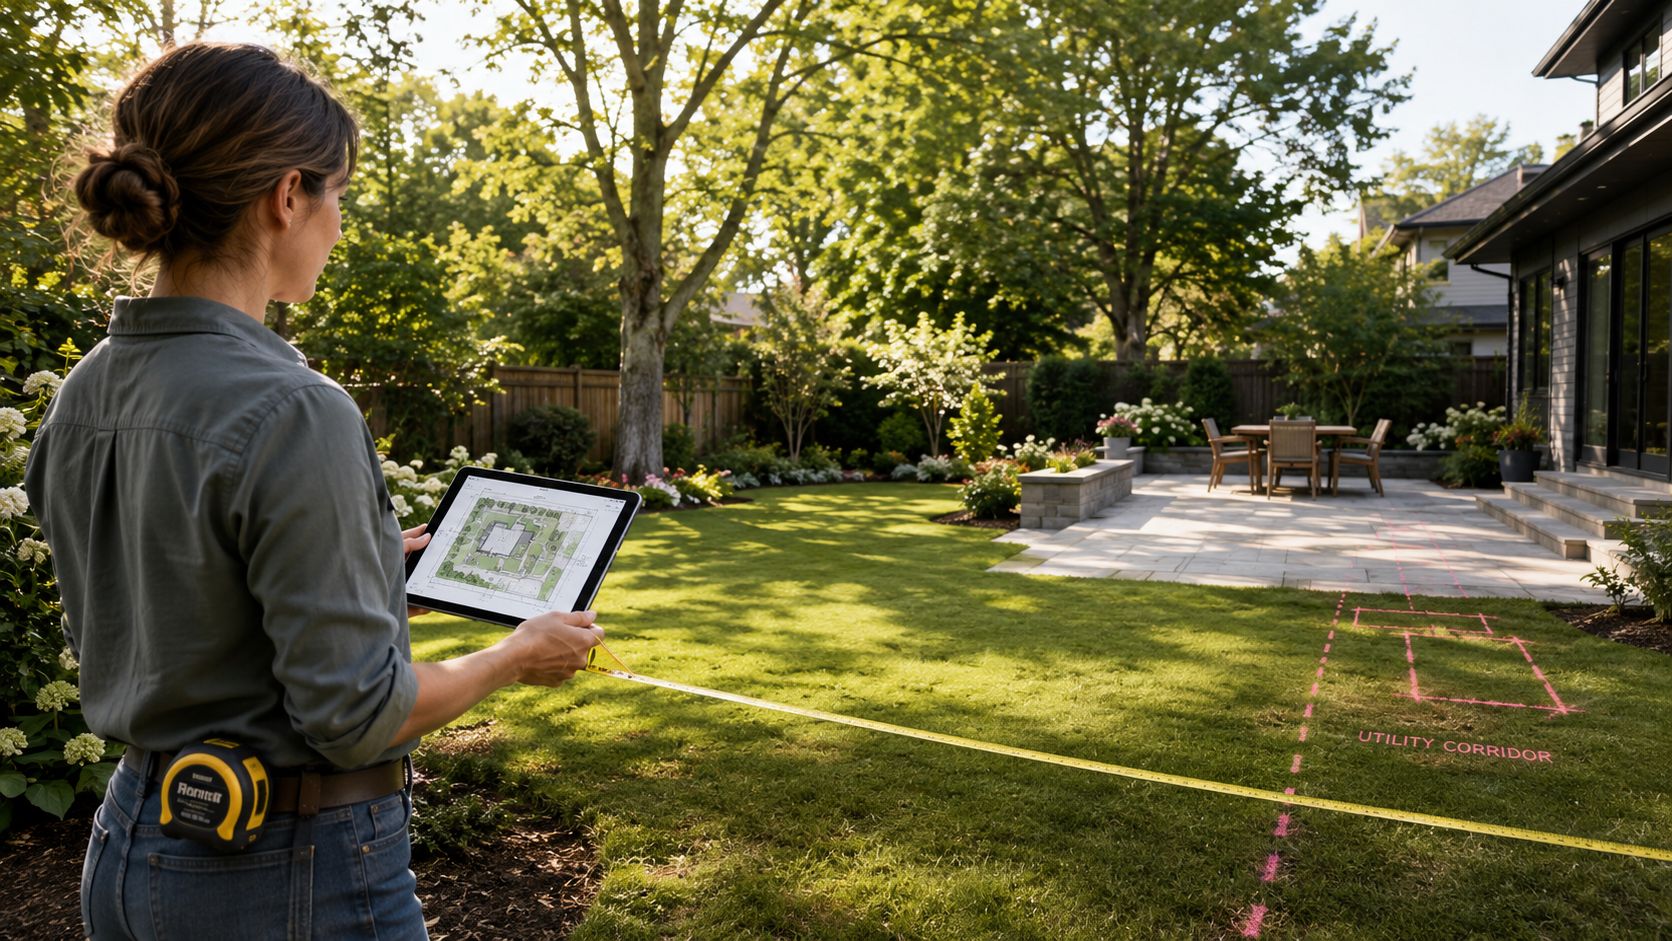
Map the yard before you draw the kitchen
A real site analysis starts with the fixed conditions you can't argue with:
- Property edges and easements: These affect where structures and utility runs can go.
- Doors and thresholds: Patio doors, side gates, and back entries shape circulation more than homeowners expect.
- Trees and overhead cover: Shade can help, but roots, leaf drop, and branch clearance matter.
- Existing hardscape: A patio may look large until you account for furniture, steps, and transitions.
- Utility points: Gas, power, water, and drainage access can change the entire layout.
For DFW properties, I'd add one more factor early. Track sun exposure during the hottest part of the day. A kitchen that faces brutal afternoon sun may still work, but that decision should be deliberate. The same goes for prevailing wind. If smoke drifts directly into your seating area or back into the house, the grill location needs to move.
A lot of the same thinking used in broader site planning applies here too. If you've ever looked at a full grounds layout process, the logic is similar to the way a garden plan should start with structure and site conditions instead of decorations.
Follow how people actually move
An outdoor kitchen is part of a larger outdoor room. It competes with dining space, pool access, play areas, and walking paths back to the house. If the kitchen pinches those routes, it won't feel comfortable no matter how good it looks.
Watch the natural traffic pattern in your backyard. People move to the grill, to the seating area, to the pool, to the towel storage, and back inside. A good plan protects those paths.
Practical rule: If guests have to squeeze behind the cook, walk through an appliance swing, or detour around hot surfaces to get to the pool, the layout isn't finished.
Build the plan in two dimensions and three
Scaled plans matter because they reveal conflicts that don't show up in casual sketching. A layout may fit on paper but fail once appliance doors open, stools pull back, or a service panel needs access.
Before anything gets built, test the kitchen three ways:
- Closed and idle: Does it fit the patio cleanly?
- In active use: Can someone grill, prep, and open storage without collisions?
- During entertaining: Can guests circulate without crossing the cook zone?
That's where outdoor kitchen design plans stop being wishful thinking and start becoming buildable.
Choose the Right Outdoor Kitchen Layout
Most homeowners start with the familiar layout types: linear, L-shape, galley, and U-shape. Those templates are useful, but they're only a starting point. In DFW, patios often have awkward realities: a pool edge on one side, a back door on another, and not enough depth to install the “ideal” footprint from a brochure.
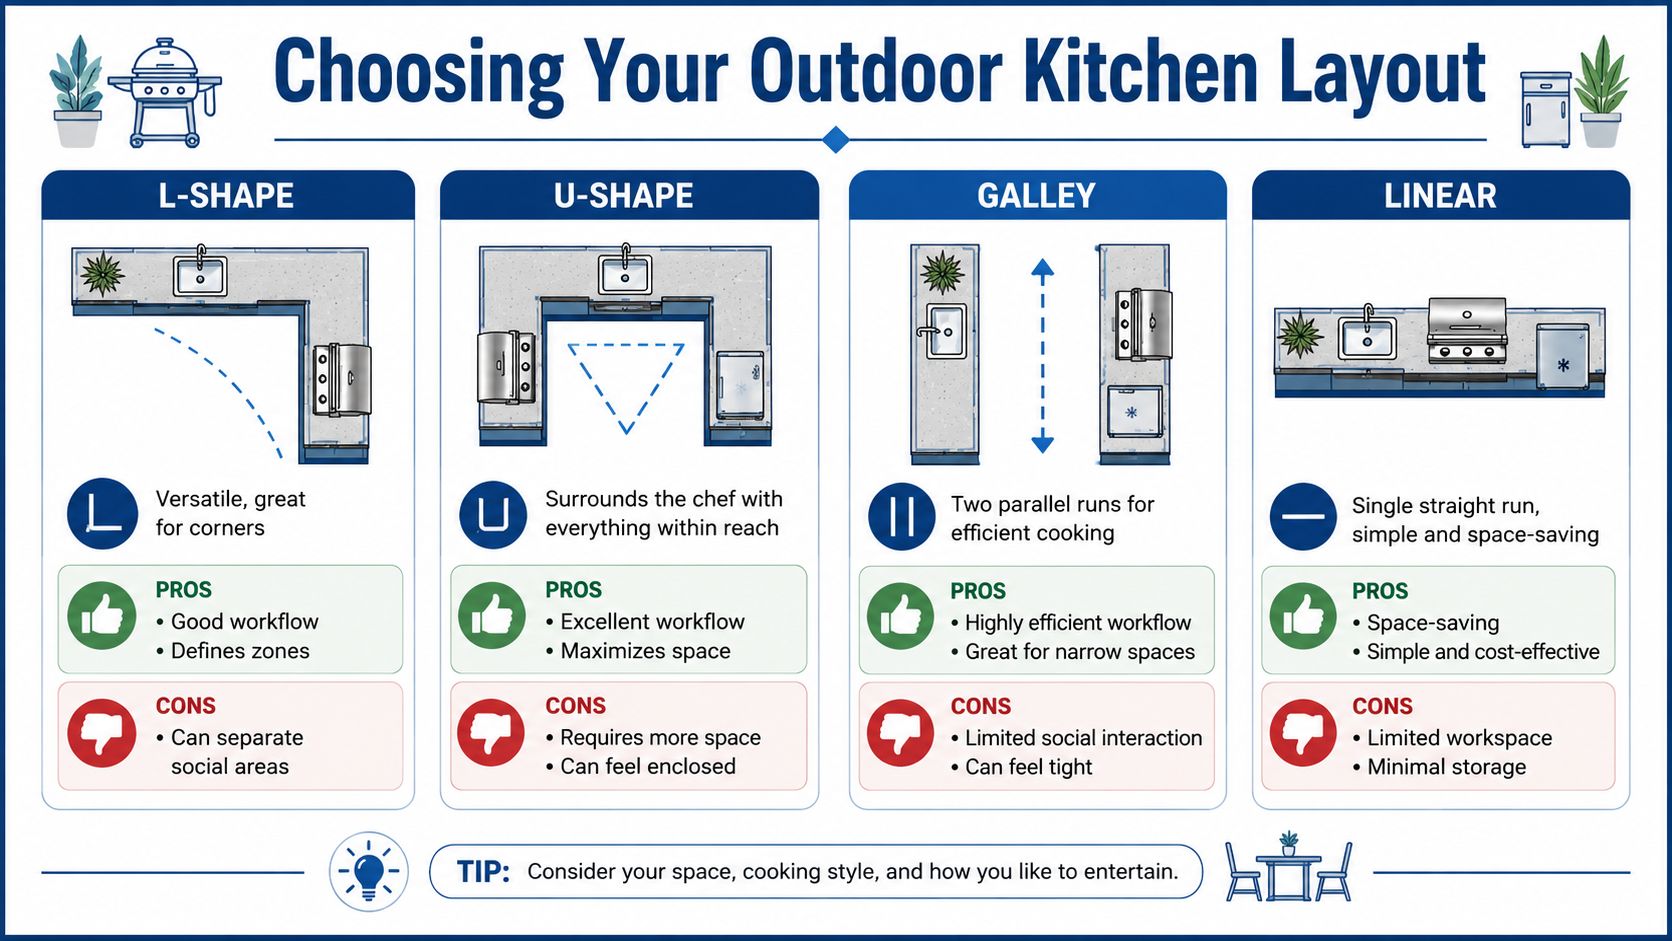
The common dimensions help frame expectations. Backyard Discovery's layout guide notes examples such as 10×10 feet for an L-shape and at least 12×12 feet for a U-shape, while also pointing out that many guides don't answer the harder question: what to do when those ideal dimensions don't exist. That gap is real. Tight patios are where design judgment matters most.
How the main layouts actually behave
Here's the practical version of each layout, not the showroom version.
| Layout | Best use | What works | What tends to go wrong |
|---|---|---|---|
| Linear | Narrow patios or simple grill walls | Clean footprint, easier utility runs, good for phased builds | Prep space gets tight fast, social seating can drift away from the cook |
| L-shape | Corner installations and mixed-use patios | Better zone separation, more counter space, works well around edges | The inside corner can become dead space if appliances are crowded |
| Galley | Long, dedicated cooking corridors | Strong workflow when both sides stay clear | Feels cramped if circulation cuts through it |
| U-shape | Larger entertainment patios | Wraparound workspace, clear cook center, strong serving flow | Needs room. If forced into a small patio, it becomes congested |
Use the four-zone model instead of copying a template
A professional plan should organize the kitchen into four zones: hot, cold, wet, and dry. Lowe's planning guidance recommends this framework so cooking, refrigeration, sink or bar functions, and prep or storage sit close enough to work together without clogging the same corner, while also planning for utilities and weather-resilient materials such as non-porous granite, soapstone, or porcelain, with annual resealing for more porous surfaces like concrete or quartzite in exposed conditions. That's covered in Lowe's outdoor kitchen planning guide.
In plain terms:
- Hot zone: grill, side burner, smoker, pizza oven
- Cold zone: outdoor refrigerator, ice maker, beverage drawer
- Wet zone: sink, bar rinse area
- Dry zone: prep counter, utensils, trash, storage
The point isn't to create distance. It's to prevent overlap. If the refrigerator door opens into the prep area, or the sink user blocks the grill landing space, the zones exist on paper only.
A small kitchen can still work beautifully if the zones are compact and clear. A large kitchen fails when every feature fights for the same square footage.
What to do in a constrained DFW backyard
When space is limited, standard advice usually breaks down. If your patio doesn't support a full L-shape or U-shape, don't force it. A well-designed linear kitchen with serious prep space often works better than a cramped corner packed with appliances.
In tight spaces:
- Keep the grill central: It usually needs the clearest landing space.
- Reduce feature count: Skip the sink or secondary appliance if it costs you prep room or circulation.
- Watch door swings: Fridge doors, trash pullouts, and storage drawers can block traffic.
- Protect key routes: Don't put appliance access between the house and the pool.
The best outdoor kitchen design plans aren't the ones with the most components. They're the ones that still feel easy to use when several people are outside at once.
Plan for Essential Utilities Early
An outdoor kitchen isn't cabinetry plus a grill. It's a utility system built into hardscape. Gas, electric, water, drainage, and lighting all have to be coordinated before the surface work locks everything in place. If homeowners wait until after concrete, pavers, or masonry are installed, changes get expensive fast.
Gas and fuel decisions affect the whole layout
The gas choice should happen early because it shapes both performance and infrastructure. A built-in grill connected to natural gas creates one kind of plan. A grill using propane storage creates another. Neither is automatically right for every household.
What matters is coordination. The fuel source needs to match the appliance selection, the cabinet design, access for service, and local code requirements. Homeowners often treat this as a late equipment decision, but it belongs in the plan set from the start.
Electrical needs are usually underestimated
Most outdoor kitchens need more power than people expect. Refrigeration, task lighting, rotisserie outlets, ignition systems, convenience receptacles, and sometimes audio or charging points all add up.
A few practical mistakes show up often:
- Too few outlets: Homeowners plan for the grill and forget prep tools, holiday lighting, or countertop appliances.
- Poor outlet placement: Receptacles end up where cords cross work zones.
- No task lighting: The kitchen looks good at night but doesn't function well for actual cooking.
Water and drainage can't be improvised
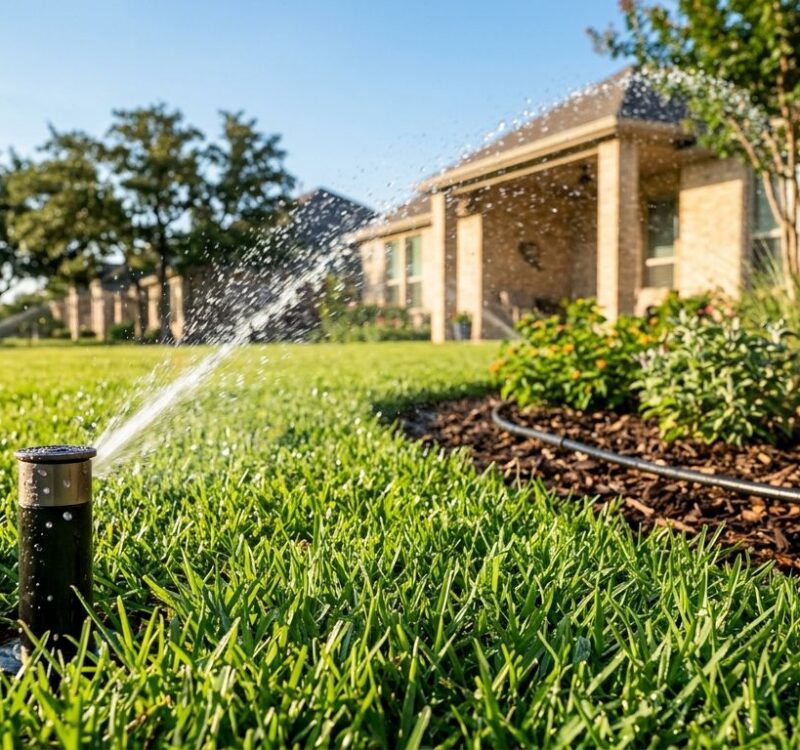
A sink sounds simple until the plumbing starts. Water supply is only half the issue. You also need a drainage plan that works with the site, the hardscape, and the municipality's requirements.
In North Texas, that discussion should include runoff management too. Heavy rain will test every patio slope, drain location, and low spot around the kitchen island. If water collects near cabinetry or under appliances, the damage usually shows up after the project is finished, not during construction.
If a sink, fridge, and grill are in the plan, the utility drawing should be just as important as the rendering.
Lighting is part of safety, not just atmosphere
Evening use changes what the kitchen needs. The cook area should have direct task lighting. Seating and bar zones need softer light. Paths back to the house, steps, and pool approaches need clear visibility.
This is one of the easiest places to spend money twice. Homeowners often install decorative lights first, then add functional lighting later after realizing the counters are dim and the grill surface is hard to see. A better plan solves both from the beginning.
Select Materials and Appliances for the Texas Climate
North Texas is hard on outdoor finishes. Long heat cycles, direct UV exposure, dust, pollen, sudden downpours, and occasional freezes all work against the kitchen. That's why material selection needs to start with durability, not just appearance.
The smartest approach in DFW is usually a durability-first one. Practical guidance for hot-climate markets recommends prioritizing grill, prep space, storage, weather-resistant cabinetry, ventilation, and long-lasting materials before decorative upgrades, as discussed in Northern Building Supply's outdoor kitchen ideas for small spaces. That matches what holds up best over time.
Countertops that survive exposure
Countertops do a lot of work in an outdoor kitchen. They take heat from cookware, grease from cooking, dust from the yard, and weather from every direction. In DFW, they also spend long periods under intense sun.
The most reliable choices are usually the materials specifically recommended for exterior durability, including non-porous granite, soapstone, and porcelain. More porous materials such as concrete or quartzite can work, but they need annual resealing in exposed conditions.
Here's a practical comparison for DFW projects.
| Material | Heat Resistance | Stain/Porosity | Maintenance | Typical Cost |
|---|---|---|---|---|
| Porcelain | Strong for outdoor use | Low porosity | Low | Varies by brand, thickness, fabrication, and edge detail |
| Granite | Strong for outdoor use | Lower porosity than many natural stones | Moderate | Varies by slab selection and fabrication complexity |
| Soapstone | Strong for outdoor use | Low porosity | Moderate | Varies by slab availability and finish |
| Concrete | Can handle heat, but exposure demands care | More porous | Higher, with resealing | Varies based on custom forming and finish |
| Quartzite | Durable, but more maintenance-sensitive outdoors | More porous than non-porous options | Higher, with resealing | Varies by slab and fabrication |
If you're already thinking through the whole hardscape palette, it helps to compare countertop decisions with the way other outdoor finishes are chosen for maintenance and edge stability. The same trade-off shows up in different landscape edging options. Some products are chosen because they look sharp on day one. Others keep doing their job after years of weather and movement.
Cabinetry should be chosen like exterior equipment
Indoor cabinet logic doesn't belong outside. Painted wood, low-grade laminates, and decorative finishes that rely on a controlled environment usually disappoint in North Texas.
Materials that tend to make more sense outdoors include:
- Stainless steel: Strong, familiar, serviceable, but fingerprints and heat gain are real.
- Marine-grade polymer: Built for exposure, low maintenance, and often a strong choice where moisture and heat are concerns.
- Masonry with access doors: Durable and substantial, though flexibility for future changes can be limited.
The wrong cabinet choice usually fails in one of two ways. It either degrades physically, or it becomes so hot and high-maintenance that the homeowner stops enjoying the kitchen.
Spend on the core appliances first
A lot of outdoor kitchens are over-applianced and under-planned. The budget gets consumed by a second cooking unit, beverage extras, or decorative inserts before the essentials are handled well.
For most DFW backyards, the core investment should go toward:
- A high-quality grill
- Real prep space
- Weather-resistant storage
- Ventilation where needed
- Appliances rated for exterior use
Field note: More features don't automatically create a better kitchen. In hot weather, every added component becomes another surface to maintain, shade, clean, and service.
What usually doesn't hold up
The weakest plans often share the same habits:
- Prioritizing looks over exposure rating
- Using porous finishes without a maintenance plan
- Adding specialty appliances that crowd out workspace
- Ignoring ventilation around heat-producing equipment
- Choosing materials that are pleasant in spring and punishing in August
Outdoor kitchen design plans should answer a simple question: what will still work well after repeated summers, storms, and everyday use?
Navigate Budgeting Phasing and DFW Permitting
Most outdoor kitchen budgets grow during design, not construction. That's normal. Once homeowners see what it takes to support a grill, sink, refrigeration, lighting, hardscape, and finish materials, the project becomes more detailed than expected. The key isn't pretending the budget won't move. It's structuring the project so the spending stays intentional.
Build the kitchen in phases if needed
Phasing is one of the most practical ways to get a strong result without forcing every feature into the first installation. It also keeps the core infrastructure aligned with the final vision.
A sensible phased approach often looks like this:
- Phase one: structure, core hardscape, grill, essential counters, utility rough-ins
- Phase two: refrigerator, additional storage, upgraded lighting, bar details
- Phase three: specialty appliances, decorative finishes, expanded seating or shade elements
That sequence matters because phase one should prepare for the later work. If conduits, gas planning, and drainage aren't considered up front, “phasing” turns into rework.
Decide what's essential and what's optional
The strongest budget conversations separate use-value from brochure-value. A grill that performs well and enough counter space to prep and serve food are usually essential. A sink may be essential for one family and unnecessary for another. A pizza oven may be heavily used or become a decorative centerpiece.
Ask these questions before approving the final scope:
- Will this feature be used often enough to justify its space?
- Does it improve workflow or just add visual complexity?
- Does it increase maintenance in a way the household will accept?
Permitting protects the investment
Substantial outdoor kitchens in DFW often involve permitting because they can include gas, electrical, plumbing, structural elements, or built hardscape tied to code requirements. The exact process depends on the municipality, and Dallas, Fort Worth, Plano, and other cities may handle review details differently.
The practical point is simple. Permits and inspections aren't red tape to work around. They protect the homeowner by making sure the project is reviewed, built to code, and documented properly.
A kitchen with gas, power, and water lines should never be treated like a casual patio upgrade.
Good planning also helps avoid the most frustrating permitting problem: redesign after submission because the original concept didn't account for access, setbacks, utility coordination, or code-driven construction details.
Hiring a DFW Contractor to Build Your Vision
A set of drawings can look solid on paper and still turn into a rough build if the contractor misses sequencing, utility coordination, or weather exposure. In DFW, that gap shows up fast. Summer heat stresses finishes, expansive clay can shift flatwork, and a kitchen tied into gas, power, water, and drainage needs a builder who handles the whole job in the right order.

What to ask before signing anything
Good contractor interviews get specific quickly. Ask about the parts of the project that create delays, change orders, or failures after the first season of use.
A practical shortlist:
- Are you licensed and insured for this scope? Gas, electrical, plumbing, and masonry work need proper trade coverage.
- Can I see completed DFW projects with similar utility and finish requirements? Local experience matters more than generic inspiration photos.
- Who is responsible for permits, inspections, and revisions if the city requests changes?
- How do you coordinate plumbing, electrical, and gas so one trade does not block another later?
- What materials do you recommend for North Texas sun, storms, and freeze events, and what do you avoid?
- How do you protect drainage around the kitchen, patio, and nearby structures?
- What is your process if site measurements or subsurface conditions differ from the original plan?
Look for process, not just photos
Photos show taste. Process shows whether the job will stay on schedule and hold up.
A qualified builder should be able to walk through field verification, shop drawings if needed, utility rough-ins, inspections, finish installation, punch work, and closeout. If those steps sound vague during the sales meeting, they usually stay vague during construction. Homeowners who want a clear standard should review a documented professional outdoor construction process for Dallas homeowners and businesses before hiring.
The builder should understand how the space actually works
An outdoor kitchen is part cooking area, part utility project, part exterior construction. The contractor needs to understand how people will move through it, where heat will collect, how wind affects the cooking zone, and how nearby surfaces and structures will perform over time.
That matters even more in North Texas. I have seen well-drawn kitchens run into trouble because the builder treated them like a simple grill island instead of part of a larger yard plan. The result is usually familiar. Counters end up too hot to use in late afternoon sun, drainage sends runoff toward the patio doors, or service access gets blocked once walls, appliances, and seat walls are in place.
The right contractor catches gaps before crews pour concrete, set stone, or run utilities.
The hiring decision comes down to execution. Choose the team that can explain trade-offs plainly, document the build steps, and make smart adjustments when field conditions change. That is what protects the investment after a long DFW summer, a hard freeze, and the first few years of real use.
If you're ready to turn ideas into buildable outdoor kitchen design plans, Rosewood can help with site inspection, planning, hardscape construction, utilities coordination, and full property integration across DFW. The best first step is a real look at your yard, circulation, sun exposure, and priorities so the kitchen fits the way you will use it.
Related posts

Expert Tree Trimming Service Dallas: Your 2026 Guide
Your Guide to a Water Irrigation System in North Texas
Native Plants North Texas: Stunning, Water-Saving Yards

Lawn Care Dallas Texas: Your 2026 Guide to a Thriving Yard